Laboratory Engineering Challenge: How Long Can an Ice Cube Last?
For this challenge, you will design an environment that will keep an ice cube from melting for as long as possible. The main idea is to protect an ice cube from the temperature of its surroundings, in such a way that it will take the longest possible time to melt. Along the way, you will learn some ideas about how buildings might be designed in order to minimize the energy needed for heating and cooling.
Step 1
Get familiar with how ice melts where you are located.
Place an ordinary ice cube on a support—what it is resting on, usually a plate or plastic lid—out in the open air. Measure how much time it takes to melt. This will give you a baseline for later comparison.
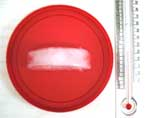
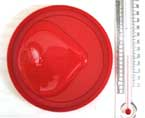
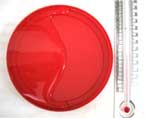
Here are the results of this step at our location. We placed an ice cube on a plastic lid in the open air. The temperature of the air was 23ºC (73ºF). It took one hour and 42 minutes for our ice cube to melt completely when exposed to the open air.
|
Start |
After one hour |
After one hour |
After one hour |
Step 2
Design an environment prototype for an ice cube that will increase the time needed for it to melt.
Hints and TipsHere are a few ideas that might be helpful. Choosing a good insulator (a material that does not conduct heat readily) will be a key design decision. Many common insulators work by trapping air. You might try Bubble Wrap or Styrofoam in your prototype design. |
Test your prototype with an ice cube of the same size and shape as in Step 1. Also make sure that the outside temperature is the same so that you will have a consistent basis for comparison. Keep a record of your melting time, a description of the environment design, and a listing of the materials you used.
Test your prototype with an ice cube of the same size and shape as in Step 1. Also make sure that the outside temperature is the same so that you will have a consistent basis for comparison. Keep a record of your melting time, a description of the environment design, and a listing of the materials you used.
Then, take a look at the simple prototype that we used at the beginning of our design development. Maybe you would like to try it as well. However, you can certainly do much better!
Step 3
Improve your environment prototype by trying other materials and designs.
Continue to keep good records. Try to find patterns in your results that will help you improve your design.
Step 4
Finalize your design.
Using what you learned from your baseline activity and your prototype exploration, create your final design. What is the longest time you recorded for the melting of your ice cube? Can you describe how the various parts of your design helped to keep the ice from melting so quickly?
Step 5
Think about what you learned from this activity.
How do you see these ideas already being used in the world around you? How might you apply these ideas in some aspect of your daily life?
Scientific Background
Here is some information about heat and temperature that you might find useful.
When heat is transferred to a solid object, such as an ice cube, the temperature of the ice rises. When the temperature of the ice reaches a critical value known as the melting point, 0ºC (32ºF), it can change from a solid state to a liquid state. In order to melt, the ice at the surface of the cube must receive enough heat to bring its temperature up to 0ºC. The ice must then receive additional heat, called the heat of fusion, to give the water molecules the energy they need to break away from the ice structure and move about more freely in the liquid state. During this transition, ice and water coexist. The temperature of the water remains at 0ºC until all of the ice is melted. After that, the temperature of the water will begin to rise if additional heat is transferred to it.
Some heat transfer takes place by conduction. This occurs when heat is transferred between two things with different temperatures that are in contact with each other. Heat will transfer from the object with the higher temperature to the object with the lower temperature until the temperature of both objects is the same. If the two objects have about the same amount of mass, the final temperature will be somewhere between the two starting temperatures. If one object has significantly more mass than the other, the final temperature will be just about the same as the initial temperature of the more massive object. For example, if you are holding a small piece of ice in your hand, heat will transfer from your hand to the ice by conduction until the ice melts and the temperature of the resulting water reaches the temperature of your hand. You will feel the cold sensation as heat is transferred from your hand to the ice. Your body has much more heat energy in it than is required to melt a small piece of ice: therefore, the temperature of your body will not change very much. The temperature of the piece of ice, however, will change a lot.
On the other hand, if a small amount of water comes into contact with the frozen Earth, heat will be transferred from the water to the Earth until the water is also frozen and reaches the same temperature as the Earth. This is because the small amount of water does not have enough heat in it to melt the much more massive frozen Earth. The temperature of the frozen Earth will not change appreciably, but the temperature of the water will change by quite a bit.
In this challenge, the ice cube is in contact with both the surrounding air and its support. The air and the support usually have temperatures higher than the ice cube. Therefore, heat will transfer from the surrounding air and the support to the ice cube. Once the ice cube has absorbed sufficient heat, it will begin to melt. Did you notice this with your ice cube? Did it begin to melt immediately, or did it seem to “wait” a while before starting to melt?
Some heat transfer takes place by convection. This occurs when heat is transferred into or out of a fluid (liquid or gas) that can flow or circulate. In this case, the surrounding air acts like a fluid. When the air that is in contact with the ice cube transfers its heat to the ice (by conduction, due to the direct contact), the temperature of that air goes down. This increases the local density of the air, and gravity causes it to sink. When the cooled air sinks, it is replaced by warmer air, which brings more heat to the ice cube. The circulation caused by such a local change in density is called a convection current. By reducing the ability of air to circulate near the ice cube, you will extend the time it will take to melt.
Material that does not conduct heat readily is called an insulator. An insulator slows down the conduction of heat between two objects of different temperatures. The insulator can be in contact with an object, and it can also act to reduce the effect of convection currents. Common heat insulators include Styrofoam, feathers, and other materials that trap pockets of air.
When comparing the results from different experiments, make sure that all ice cubes come from the same source, so that they all start out at the same temperature. An ice cube starting at -15ºC (5ºF) will take more time to melt than one beginning at -10ºC (14ºF).
This content has been re-published with permission from SEED. Copyright © 2024 Schlumberger Excellence in Education Development (SEED), Inc.
Course:


