This activity created in partnership with AGI.
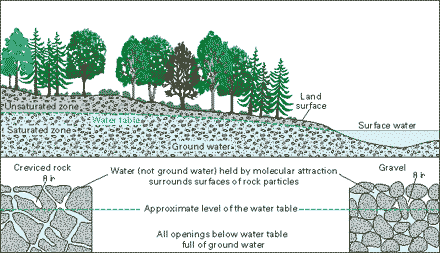
When rain falls or snow melts on the Earth’s land surface, several things can happen to the water. Some evaporates back into the atmosphere. Some flows downhill on the surface, under the pull of gravity, and collects in streams and rivers, which empty their water into the oceans.
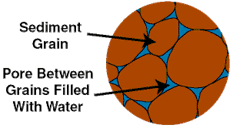
But some rainwater or snowmelt soaks into the ground rather than evaporating or running off. Once in the ground, some of the water may be absorbed by the roots of plants in areas with vegetation. The rest of the water continues to move downward, owing to gravity. It flows into the open spaces, or pores, in soil and underground rocks and becomes groundwater.
There is water beneath the surface of all of the planet’s landmasses—more than 23,400,000 km3 (5,614,000 mi3) of groundwater, or 1.7% of all the water on the Earth. But this amount includes fresh and saline groundwater; there are 10,530,000 km3 (2,526,000 mi3) of fresh groundwater on the planet, 0.76% of all the water on the Earth. This groundwater is the planet’s second-most-abundant reservoir of fresh water, after glaciers and ice.
To access groundwater, wells are drilled into water-bearing rocks below the surface and the water is pumped up. Like other sources of freshwater, groundwater is used in homes and for commercial, industrial, and agricultural uses. It is an especially important water source in rural areas, where it is used for drinking and other household purposes. As the human population continues to grow, the use of groundwater increases, and its importance as a fresh water resource follows suit.
Our Experiment
You may not realize it, but water is present everywhere beneath the Earth’s surface, even in dry deserts. Most groundwater is in motion, moving through pores and fractures in the subsurface rocks. Unlike the swift flow of rivers, however, the movement of groundwater is quite slow.
In this activity, you will create models of what is below the Earth’s surface to observe the flow of groundwater. Gravel and sand represent sediments and rocks beneath Earth’s surface, with drinking straws acting as wells. By streaming or spraying water on your model you can see how the water moves through the different materials and how the properties of these materials affect water flow.
We suggest that you work in groups of two or three on this activity.
Tools and materials
- Rectangular transparent plastic box approximately 40 cm by 20 cm (16 in by 8 in) and at least 15 cm (6 in) deep.
- Small drill or a hammer and nail to make holes in one end of the box.
- 2.5 kg (5.5 lb) of small gravel
- 1.5 kg (3 lb) of sand
- Six transparent plastic drinking straws
- Tape
- Centimeter ruler
- Stopwatch or timer
- Paper towels
- Watering can, tubing, or spray hose for continuous water supply
- Food coloring
- Plastic sheeting
- Sink or bowl to catch the water
- Marker or pen
What to do
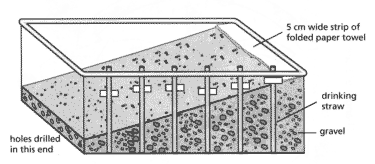 Image courtesy of AGI.
|
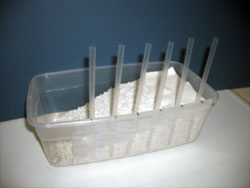
In this project you will examine the flow of groundwater, first through gravel and then through a mixture of gravel and sand. Your setup will look like the drawing at right.
The paper towel represents the Earth’s surface. By keeping it wet with a steady stream or spray of water, you will be able to observe how water flows through the different materials.
Before you begin, think about what might affect the flow of the water through sand versus the flow through gravel.
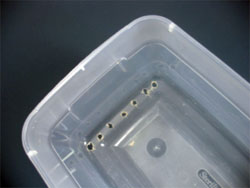
- In the bottom of one of the shorter ends of the transparent plastic box, carefully drill six to eight holes, each approximately 7mm (0.25 in) in diameter and relatively evenly spaced across the end.
Safety note: The drill or hammer and nail need to be used carefully and under close supervision. Safety goggles are recommended for this portion of the activity.
|
|
-
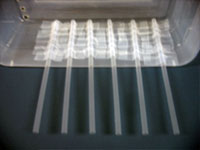
Lay six transparent drinking straws inside the transparent plastic box along one of the longer walls, perpendicular to the bottom. The end of each straw should sit just above the bottom of the box. Space the straws equal distance apart, and then tape them into place, making sure that each straw is enclosed by the tape. This will prevent sand and gravel from getting into the straws. On the outside of the box, number the straws 1 through 6, starting with the straw farthest from the end with the holes.
|
-
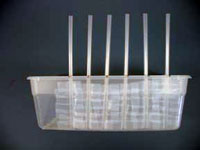
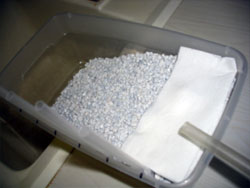
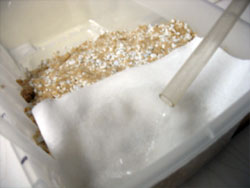
Fill the box half full with the small gravel. Then push the gravel upward and away from the end with the holes so that it forms a hill, with the high end away from the holes. Fold a paper towel into a strip about 5 cm (2 in) wide and place it flat at the top of the gravel hill, as shown in the photograph.
|
|
-
For the next part of this activity, you need to work by a sink or have a bowl situated below to catch the water that runs off.
Place the box on a horizontal surface, and make sure the end with the holes (the low end of the slope) sits over the edge of the sink or bowl, so the water can drain out of the box. Be sure to level the box so it does not slope into or away from the bowl or sink. Position your hose or watering can so that you will be able to soak the paper towel with a slow stream or spray of water.
|
|
-
Start a slow stream or spray of water onto the paper towel, moving the water source from left to right for even coverage. Start your timer.
While you are waiting for the water to appear at the bottom and flow out of the holes, predict the level of water in each of the straws. Explain your prediction.
-
When water begins to flow out of the holes at the bottom, record the time. Keep the water flowing in a slow, steady stream, and measure the height of the water level in each of the six straws. How closely do your measurements match your prediction?
|
-
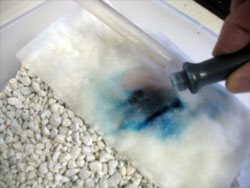
With the water still flowing, add four drops of food coloring to the middle of the paper towel. Record the time.
|
|
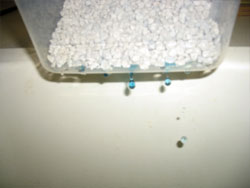
- Continue wetting the paper towel. When you see the colored water dripping from the holes, record the time.
|
|
-
Keep wetting the paper towel until the water dripping from the holes becomes clear, and then record the time again.
-
Stop the water supply. When the water dripping from the holes slows to a bare trickle, record the time.
-
Remove the wet gravel and dry out the plastic box.
-
Now, you are going to repeat the process with a mixture of gravel and sand. Fill the box to the one-quarter level with dry gravel; then add enough sand to fill the box halfway. Mix the sand and gravel together, but be careful not to disturb the straws taped to the side of the box.
-
Push the sand and gravel mixture upward and away from the end with the holes so that it forms a hill with the high end away from the holes, as before.
|
-
Repeat steps 4 through 10 for the mixture of gravel and sand. Record the same observations and data.
|
|
- Use your results from all parts of the activity to answer the following questions:
- Describe the pattern of water heights in the tubes you observed. How did it compare with your predictions? How do you explain the pattern you observed?
- Were the water levels in the straws higher for the gravel or for the sand/gravel mixture? Were the water levels the same in all straws for each material? Why or why not?
- After you shut off the water, did it take longer for the water to stop flowing through the box with the gravel or with the sand/gravel mixture? Why?
- Which substance allowed the colored water to reach the holes in the container sooner? Why?
|
|
 |
Digging Deeper
Find out more about
|
|